Introduction to Mastering Loomis Head Drawing Method
Drawing the human head accurately remains one of art’s most challenging skills to master. The Andrew Loomis Method revolutionizes this process by breaking down complex head structures into simple, manageable geometric shapes.
This systematic approach has transformed countless artists’ ability to capture heads from any angle with confidence and precision. The method’s genius lies in its universal application – whether you’re sketching portraits, creating cartoon characters, or developing concept art.

In this comprehensive guide, you’ll discover:
- A step-by-step breakdown of the Loomis Method fundamentals
- Techniques for drawing heads from multiple angles
- Detailed instructions for placing facial features accurately
- Tips for adapting the method to your personal style
- Practice exercises to build your confidence
The beauty of the Loomis Method lies in its accessibility – beginners can grasp the basic concepts quickly, while experienced artists can use it to refine their existing skills. This time-tested approach provides a solid foundation for creating believable, well-proportioned head drawings that capture the essence of your subjects.
Understanding the Andrew Loomis Method
Andrew Loomis (1892-1959) changed art education forever with his series of instructional books, including the groundbreaking “Drawing the Head and Hands” published in 1956. As a well-known American illustrator and art teacher, Loomis developed his method during the golden age of illustration, using his vast experience in commercial art and portraiture.
His systematic approach broke down complex head structures into simple geometric shapes, making portrait drawing accessible to artists at all skill levels. The foundation of his method lies in a basic sphere divided by intersecting lines – a technique that helps artists visualize the head in three-dimensional space.
The Key Geometric Concepts of the Loomis Method
The Loomis Method introduces three key geometric concepts:
- The Ball/Sphere: Represents the cranium and establishes the head’s basic form
- The Center Line: Creates symmetry and guides feature placement
- The Hairline-to-Chin Plane: Determines facial proportions and angle relationships
How the Loomis Method Benefits Artists
This geometric framework allows artists to:
- Draw heads from any angle with consistent proportions
- Understand the relationship between facial features
- Create believable character designs
- Maintain structural accuracy in stylized artwork
Versatility of the Loomis Method
The method’s strength lies in its versatility – while rooted in realism, these principles apply equally to cartoon, manga, and other stylized art forms. Artists can adapt the basic framework to suit their personal style while maintaining anatomical accuracy.
Emphasizing Understanding Over Copying
The Loomis approach emphasizes understanding rather than mere copying, teaching artists to construct heads from imagination by internalizing these fundamental geometric relationships. This deep structural knowledge forms the backbone of confident, accurate portrait drawing.

Step-by-Step Process of the Loomis Method
Let’s break down the Loomis Method into actionable steps you can follow to create accurate head drawings from any angle.
- Basic Sphere Construction
- Start with a perfect circle representing the cranium
- Draw a center line vertically through the sphere
- Add a horizontal line at the eye level, crossing the center line
- Mark the halfway point between the top of the head and eye level
- Facial Plane Development
- Cut away the bottom quarter of the sphere at a 45-degree angle
- Create side planes by flattening the sides of the sphere
- Draw the jaw angle from the ear position to the chin
- Connect the chin to the front plane with curved lines
- Feature Placement Grid
- Divide the face into thirds vertically:
- Hairline to brow line
- Brow line to bottom of nose
- Bottom of nose to chin
- Mark the mouth position approximately one-third up from the chin
- Place ears between the brow line and bottom of nose
The Core Structure of the Loomis Head
Before we get into drawing, let’s understand the key components of the Loomis head:
- Sphere – The cranium
- Side Plane (Flattened Circle) – A portion of the sphere cut out to mark the side of the head
- Center Line (Vertical) – Indicates direction and tilt
- Eyebrow Line – Halfway vertically on the front face
- Hairline, Nose Line, Chin Line – Divide the lower half into thirds
- Jaw Construction – Added from the sides down to the chin
Step-by-Step: Drawing the Loomis Head (Front View)
Let’s walk through drawing the Loomis head from the front.
Step 1: Draw a Sphere
Start with a light, clean circle. This is the cranium or top part of the skull.
Step 2: Flatten the Sides
Imagine slicing off a bit from each side of the sphere. These side planes define the width of the head and help place the ears.
Step 3: Draw the Center Line
Add a vertical line down the middle. This shows you which direction the head is facing. For the front view, it’s a straight vertical line through the center.
Step 4: Add the Brow Line
Now draw a horizontal line halfway through the sphere. This is the brow line—a crucial reference for placing eyes and ears.
Step 5: Add Hairline, Nose Line, and Chin Line
- Divide the bottom half of the sphere into three equal parts.
- These mark the hairline, nose, and chin.
- The bottom third below the nose line gives the jaw and completes the chin.
Step 6: Construct the Jaw and Cheeks
Draw lines from the edge of the side plane down to the chin to form the jawline.
Step 7: Add Ear Placement
The ears go between the brow line and nose line and fit perfectly on the side plane.
rawing Heads From Any Angle
Now let’s take things up a notch. Once you master the front view, you’ll want to rotate the head in space.
How to Rotate the Head:
🔹 Step 1: Tilt the Sphere
Think of the sphere like a 3D ball. Tilting it forward/back or side to side changes the head’s orientation.
🔹 Step 2: Wrap the Center Line
Draw a curved line across the sphere vertically to represent the direction the head is facing.
🔹 Step 3: Wrap the Brow Line
Draw a horizontal curve to represent the brow. The curve helps show the tilt.
🔹 Step 4: Place the Side Plane
Based on the tilt, place the side plane on the correct side. It should be elliptical and follow the contour of the sphere.
🔹 Step 5: Add Jaw and Chin
Use the center line as your guide to build the rest of the head: jawlines, chin, and facial symmetry.
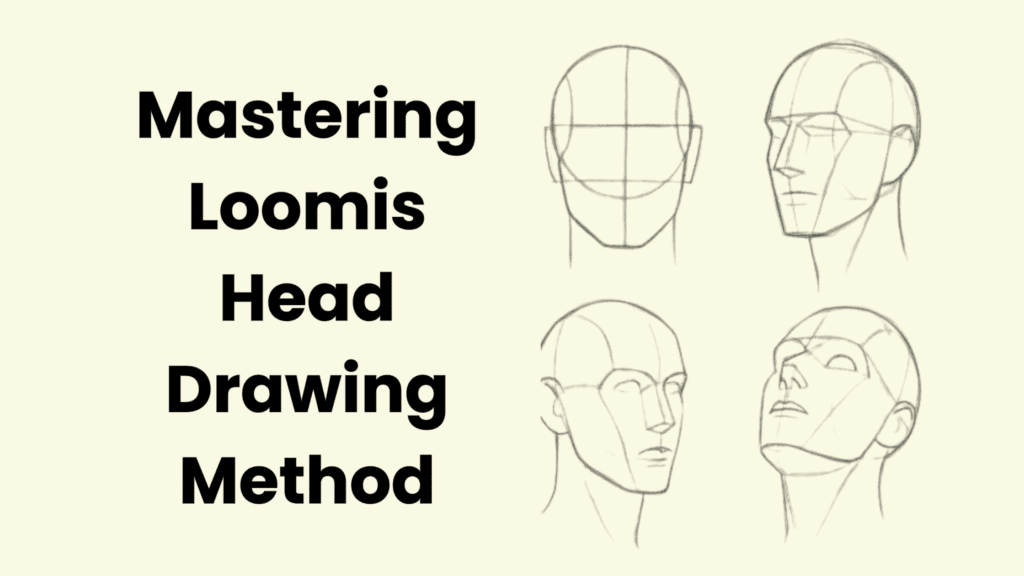
Practice These Angles:
- 3/4 view (most commonly used in portraits)
- Profile (side view)
- Upward angle (worm’s eye view)
- Downward angle (bird’s eye view)
Male vs Female Heads
Although the structure is the same, there are subtle differences between male and female heads:
Male Heads:
- Squarer jaw
- More angular features
- Thicker neck
- Pronounced brow ridge
Female Heads:
- Rounder jawline
- Softer cheekbones
- Smaller nose
- Subtle brow ridge
Tip: Keep features soft and curved for females, sharp and blocky for males.
Drawing Children and Elderly Heads
The Loomis method also adapts well for different age groups.
Children:
- Larger cranium relative to face
- Small chin and jaw
- Eyes placed lower on the face
- Rounder cheeks
Tip: Use fewer lines and avoid harsh shadows.
Elderly:
- Sagging skin and less defined jaw
- Wrinkles around eyes, forehead, mouth
- Bony structure becomes more visible
Tip: Emphasize texture and structure with fine lines and shading.
Drawing Individual Features
Eyes
- Position eyes equally spaced on either side of the center line
- Each eye width equals one-fifth of the head width
- Space between eyes equals one eye width
- Upper lid overlaps lower lid at outer corner
- Add tear ducts at inner corners
Nose
- Width equals distance between inner corners of eyes
- Bridge starts at brow line
- Ball of nose sits on the bottom third line
- Nostrils extend slightly past the nose’s main mass
- Add wing structures for realistic detail
Mouth
- Width aligns with pupils of the eyes
- Upper lip has three distinct parts
- Lower lip is fuller and simpler in shape
- Corners turn slightly upward
- Add subtle indentation below lower lip
Ears
- Top aligns with eyebrow line
- Bottom aligns with nose bottom
- Angle follows jaw line
- Width equals roughly half the length
- Add helix, antihelix, and lobe structures
Advanced Techniques for Realism
- Perspective Adjustments
- Foreshorten features based on head rotation
Common Mistakes to Avoid
Even with a solid system like Loomis, beginners often stumble. Watch out for:
- Misplacing the brow or nose line
- Not wrapping lines around the form
- Jawlines that don’t connect to the chin properly
- Flat features (not following the curved surface)
- Eyes too close or too far apart
Fix: Go back to the sphere and side plane—don’t skip construction!
The Loomis Method is a powerful tool for mastering head drawing, but your artistic journey doesn’t stop there. To grow as an artist, you need to practice regularly and explore this versatile method on your own.
Key Takeaways for Your Artistic Development:
- The Loomis Method provides a reliable framework for understanding head construction
- Regular practice leads to intuitive understanding of proportions and angles
- Your unique artistic voice emerges through experimentation with the method
Remember that every professional artist started as a beginner. The structured approach of the Loomis Method gives you a clear path to improvement, but your dedication to practice determines your progress. Start with simple front-view drawings, then challenge yourself with more complex angles and expressions.
Practice Tips for Continued Growth:
- Draw heads for 15-30 minutes daily
- Keep a sketchbook dedicated to head studies
- Reference diverse faces from photos and life
- Study other artists’ interpretations of the method
Your artistic style will naturally develop as you become more comfortable with the fundamentals. The Loomis Method doesn’t restrict creativity – it empowers you to draw with confidence and accuracy. Whether you’re pursuing character design, portrait art, or comic illustration, these principles will serve as your reliable foundation.
Take pride in your progress, no matter how small. Each drawing brings you closer to mastery, and every mistake teaches valuable lessons. The journey of artistic growth continues long after you’ve learned the basic method.
Start your practice today. Pick up your pencil, open your sketchbook, and begin exploring the endless possibilities of head drawing with the Loomis Method as your guide.